Saturday, February 23, 2013

Legal Disclaimer

Legal Disclaimer

This Agreement is entered into and performed in the State of Texas, United States of America.   It is governed by and shall be construed under the laws of Texas.

Users shall not view, use, download, export or copy any content of this site except as provided for in the site.  Blue Collar Bike Werks will prosecute Copyright Infringement to the full extent of the law.

All access to the Web site is voluntary and at the sole risk of the user.  Blue Collar Bike Werks does not warrant the accuracy of any materials on the site or any other sites linked to or from it.  Whereas Blue Collar Bike Werks strives to present timely and accurate information, it makes no representations that this information is free of errors or omissions that may be considered material.  Blue Collar Bike Werks will not be liable for any decision made or action taken in reliance upon the information provided on the Web site, except for information, products or services clearly and specifically identified as being supplied by Blue Collar Bike Werks, Blue Collar Bike Werks does not endorse any products or services this Web site or other Web sites linked to or from it.

Information provided on Blue Collar Bike Werks Web site is not targeted to users in any particular locality nor is it intended to constitute the doing of business in any jurisdiction. This Web site is a service provided by Blue Collar Bike Werks and does not constitute any contact with any jurisdiction outside the State of Texas.  Use of the Web site is prohibited in any jurisdiction having laws that would void this Agreement in whole or essential part or which makes accessing the Web site illegal.  Users in such jurisdictions visit and use the Web site entirely at their own risk.

If you contact Blue Collar Bike Werks and request information about our products or services, we will use your email or postal address only to provide the information you requested.  Providing information to us is voluntary and the information we collect is used only for the purpose for which it was collected.  We do not share your information without your authorization or unless we are required to do so by law.  If you do not wish to submit your information electronically, please telephone us at 830-237-3009.

Blue Collar Bike Werks provides links to other Web sites that provide information or services which may be of help to you.  Blue Collar Bike Werks provides these links for your convenience only.  It is not responsible for the content of these sites or the programs, agencies, or businesses they describe.  Blue Collar Bike Werks does not guarantee that these sites will meet your particular purposes.

Friday, February 22, 2013

Internet Tech Forums


‎***Tech Tip of the Day*** While there is some good info to be had on internet forums... that info is only as good as the person posting it. THERE IS A LOT OF MISS-INFORMATION OUT THERE. Just because your neighbour's brother's uncle heard from a friend they did this or that to his bike doesn't mean its a good idea. You will have to sift through the bad stuff to get to the good. Cutting carb springs and drilling jets is no substitute for a good Jet Kit just like an internet forum is no substitute for a good mechanic you know and trust.
 
--Aaron

Thursday, February 7, 2013

Jetting Keihin CV Carbs

We got a 1996 XL883 Sporty in this week for some carburetor issues. It had a 48 slow jet and a 190 main jet on an otherwise stock bike. Holy Moly! BIGGER IS NOT ALWAYS BETTER.
Here are a few tips for jetting Keihin CV carbs.

1. Eliminate intake air leaks. If you are fighting an intake leak you are already losing the battle. With the bike running, spray a little shot of brake cleaner from an aerosol can with a long straw on the intake flanges where they meet the heads. If the bike bogs out you have an intake leak. Replace the seals.

2. Make sure you are using good, fresh fuel. Check the fuel tank for rust in the bottom and on the petcock screen. Debris in the float bowl can plug up jets and interfere with normal float operation.

3. Clean the carb and inspect all the components. Spraying "carb cleaner" in the intake is NOT a substitute for a carb bath and new seals and orings. The vacuum piston can get burnt and worn over time also. Replace any damaged or worn parts and all seals before any tune.

4. Use the proper tools. Carb screws are notoriously easy to strip and round out. Also a good punch set is recommended. You don't want to replace a expensive carb body because you broke it with a hammer or broke a mixture screw off.

5. Know what you are working with. Engine mods play a vital role in jetting. But also knowing whats in your carb will help you out. Unfortunately there are a many different aftermarket "Stage" kits available for carbs. Knowing which kit you are working with will help you tune. We use and recommend the DynoJet kits.

6. READ THE DIRECTIONS!!! All the older Harley-Davidson Service Manuals have extensive carburetor tuning sections. Also all of the DynoJet kits come with detailed instructions. These will tell you exactly what jets to install, where to put needle settings and how to set floats and mixture screws. They also offer guidance on troubleshooting for problems. Incidentally most of the instructions are readily available online.

7. Don't modify components. There is no reason to go with the "poor man's jet kit." Don't cut loops out of springs to make them softer. Don't drill out jets to make them bigger. These parts are inexpensive and readily available. There is no need to butcher them for a proper tune. Only modify parts if your instructions tell you. (i.e. Drill out vacuum piston air hole)

8. In conclusion, armed with good, clean components, the proper tools, the right information and a little patience. You should be able to achieve a streetable and rideable tune for any Harley-Davidson Air Cooled V-Twin running a CV Carburetor without having to put it on a dyno.

 Don't do this.  Wrong hardware.  Wrong Air Cleaner for Carb.  Mounted with out a support bracket to attach to the heads.  This actually covers up vacuum holes that need to be there for carb to work properly. 

Wednesday, February 6, 2013

Back Bleed Squishy Brakes

We have run into this problem from time to time.  Most people assume just bleeding the brakes cures all your squishy problems but here is another trick that will help you out when dealing with squishy front brakes on Harley Davidson Motorcycles.

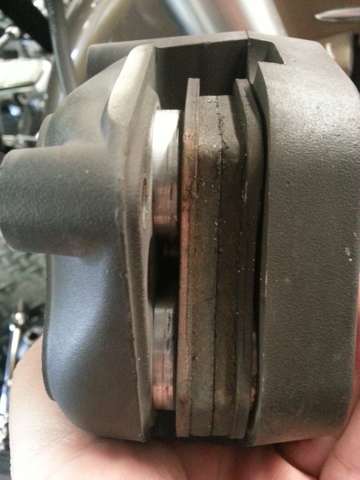
We are working on a 2004 FLHR dual disc front brake setup. Pic#1 Shows how far the lever pulls back. This brake system has already been properly bled out and flushed with fresh fluid. As you can see the brakes will grab but the lever will pull almost to the grip before they do.


Pic #2 Shows the reason why. Dirt in the caliper. Also notice how the pistons don't protrude equally from their bores. Brake dust and road grime over time gets into the piston bores in the caliper and gums up the o-rings. This causes the pistons to stick in their bores and the hydraulic pressure (feedback at the lever) to fade. This results in a squishy lever and can also cause the pads to wear unevenly.


Pic#3 Shows dirt on the pistons.


Heres how we fix it. Start by removing the caliper and pumping the brakes repeatedly until the pistons come out of their bores. Then we spray them down with brake cleaner.


Then blow them dry with compressed air.


Pry the pads apart with a pry bar or big flathead screwdriver. (Notice if you are replacing the pads you will want to do this process with the old pads installed so as not to damage a new set of pads.)


You might have to hold one side of the pads while pumping the brake lever to get the opposite side pistons to come loose.


Repeat the process of cleaning, drying, prying and pumping 3-4 times. What you want to end up with is pistons that are clean and shiny and that all come out of their bores at the same rate like the below pic.


Install your new pads.


Reinstall the caliper and torque all fasteners to spec as per the service manual. Repeat this process for the other side caliper.


Notice the difference in pull between where our lever started.


And where our lever is now. We have a lot more lever available than we did before.


Always remember to recheck the fluid level in the master cylinder when you are done. Hopefully this helps you out next time you deal with squishy front brakes on your Harley Davidson V-Twin.
You can always hit us up at www.BlueCollarBikeWerks.com if you have any problems or questions. And feedback is always appreciated. --Aaron

Sunday, February 3, 2013

Tools of the Trade


                                                         Shop Diagnosis Flow Chart
Step 1.  Drink Beer
Step 2.  Consult Magic 8 Ball
Step 3.  Use jumper wires to let smoke out.
Step 4.  Use hammer to put out fire.
Step 5.  Repeat steps 1-4  and blame problems on last mechanic who worked on bike.

Thursday, January 31, 2013

The E15 Apocalypse


                       V-Rod Fuel Pump with High Pressure Side Nipple Pushing Out Of Body


So, E15 is on its way.  And the government has just now realized that Ethanol is bad for engines.

http://washingtonexaminer.com/study-new-e15-gas-can-ruin-auto-engines/article/2520078

From the article:

"The additional E15 testing, completed this month, has identified an elevated incidence of fuel pump failures, fuel system component swelling, and impairment of fuel measurement systems in some of the vehicles tested. E15 could cause erratic and misleading fuel gauge readings or cause faulty check engine light illuminations. It also could cause critical components to break and stop fuel flow to the engine."

We have been seeing this for several years now.  E10 is tearing up not just automotive fuel pumps but Harley-Davidson EFI fuel pumps as well.  There are several problems with E10.  It separates the moisture out of the fuel so water pools in the bottom of the tank.  Then when you run low you get a big shot of water into your motor.  It also softens up hard plastic parts that make up fuel pump bodies and makes them brittle.  We have seen fittings back out of their bores and o-rings fail where they never did with regular gas. (See Picture)  

Sadly there is not much you can do to combat these problems.  There are a few products on the market that fight the water issue.  Amsoil makes "Quickshot" and Startron makes a fuel additive.  There is nothing on the market that helps with the softening of the plastics problem.

Maybe the best course of action would be to call your Congressmen and Senators and tell them,        

                                             "HARLEYS DON'T RUN ON CORN!" 


Thursday, January 24, 2013

Not All Batteries Are Created Equal

Contrary to popular belief. Not all batteries are the same. They may look identical and have the same outer dimensions but it's the guts that count.

For example. Take a late model Softail/Dyna battery. The stock battery is rated at 310 CCA. CCA being cold cranking amps. WalMart sells a lawnmower battery that will fit. It is the same outer dimensions as the stock battery. It even looks like it might be made by the same manufacturer. But the CCA is only 270. It will start a bike a few times. But not enough juice to last very long. Check the CCA rating. It needs to be the same as stock.

Also stay away from conventional batteries. The fumes from conventional batteries is corrosive. It will corrode wiring and steel. Stick to absorbed glass-mat or gel cell batteries. If you want to get the most out of your batteries use a battery tender/trickle charger. They can be had at most auto parts stores for around $40.

There are some high performance lithium-ion batteries coming on the market. They have a CCA higher than stock. This is good news for those of you who have high compression motors and need a little extra juice.

--Aaron


Wednesday, January 23, 2013

Tires Tires Tires

Here is some info on tires that you might or might not know.

1. Tire pressure. Check your tire pressure regularly. It doesn't take a lot of time. But we get bikes in all the time with 10lbs of pressure in them. Your tires will last a lot longer if you keep them properly inflated. And you only got two of them. The PSI printed on the tire is the Max PSI not the recommended PSI. The cold PSI for Harley-Davidson Motorcycles is printed on a sticker on the frame down-tube.

2. Tire manufacture dates. Pic #1 is a manufacture date on a Dunlop tire. All tires have a 4 digit manufacture date on them somewhere. It is usually in an oval stamp. This one reads "3006". That means it was manufactured in the 30th week of 2006. BEWARE BEWARE BEWARE of cheap tire deals from wholesalers online. Ask for the date code before you buy. Most of the time they are trying to unload old stock tires.

3. Pic #2 is Green Slime in an aluminum rim. BAD IDEA! In addition to pissing off your mechanic it rarely works. Here is another reason to NOT USE IT. It reacts with and eats aluminum. The rim in the pic had Green Slime in the tire for over 6 months. There were quarter size chunks falling out of the inside of the rim. Think of it this way. A $60 tow and a $150 tire is not equal to ruining a $1,000 dollar rim. Also don't use plugs or patches or other roadside fixes. A $60 tow is not worth your life if that tire fails.


A Word On Wiring

We have come across this quite often recently, so I feel it needs addressing. Fixing wiring or adding lights, LEDs, horns...etc... DO NOT twist your electrical connections together and then tape over them. DO NOT use cheap crimp connections that are the wrong size. That might cut it in the car world but in the air-cooled v-twin world its asking for a myriad of problems later.

Now before you laugh, we have seen this twice this month and once last month. So it does really happen. You would think it was common sense to solder and heat shrink your electrical connections, but not everyone does. My favorite was someone who went to all the trouble to heat shrink connections and had twisted the wires together underneath. The problem on Harleys and motorcycles in general is heat and vibration. You ground wires out, short them out and generally cause all kinds of mayhem and as the wires shake around they loosen up and get worse.

You can get all the supplies you need from AutoZone, Oreilly's or Radio Shack rather inexpensively. Doing the job right the first time will save you trouble and money in the long run. Nobody wants to pay for hours of electrical diagnosis that could have easily been avoided. Don't cheap out and cause yourself more problems later.

--Aaron


Friday, January 11, 2013

Introduction

So here we go with the tech blog.  What I hope to accomplish here is to impart some of the tips and tricks that I have gleaned over the 10+ years I have been working on Harleys.  The stuff you dont find in the service manual or on youtube.  Speaking of youtube, we might do some videos to help in what we are trying to get across.  We hope you enjoy your stay and feed back is always appreciated.

Thanks,  Aaron